Understanding Large-Format Print Resolution
When it comes to printed graphics, resolution is one of the most important factors in achieving a crisp, professional result. Yet many people don’t understand why or how to evaluate an image’s resolution. Whether you’re designing retail graphics, a billboard, or museum graphics, understanding how print resolution works can significantly improve the quality of your project. In this guide, we’ll break down the basics of print resolution, explain when higher PPI is essential, and share practical tips to ensure your file is print-ready.
PRINT RESOLUTION BASICS: WHAT ARE DPI & PPI?
DPI is an abbreviation for dots per inch. It’s a measurement of resolution, indicating how many dots of ink are printed by an offset printer on one inch of material. The higher the DPI, the smaller each dot is, the greater the detail, and the better the potential image quality. (We say potential because the quality of the original image is key to a beautiful output.)
Here at Infinity Images, we use digital inkjet printers, as opposed to offset printers, so the term DPI is technically not part of our workflow. Instead, PPI — short for pixels per inch — is used to describe resolution. The two terms are colloquially interchangeable, with minor technical differences: PPI measures the number of square pixels in one inch of a digital image, whether viewed on screen or printed. Ultimately, whether the term DPI or PPI is used — or whether you say dots or pixels — the practical effect on output quality is the same.
WHEN HIGHER PPI MATTERS (AND WHEN IT DOESN’T)
As a rule, we ask our clients to submit artwork at an Effective Resolution of 100 PPI at final size. This means that when the artwork is printed at its final size (100%), the image resolution will be 100 PPI. If the artwork is designed at half size (50%), then the image must have a resolution of 200 PPI, double the standard 100 PPI. This ensures that when the image is enlarged to print at final size, the Effective Resolution meets our 100 PPI requirement.
Why is 100 PPI important? The human eye cannot see pixels as small as 100 PPI unaided. As pixels get bigger, unwanted jagged edges within an image become apparent, and the quality suffers. In short, higher resolution means smaller, less noticeable pixels. That said, the intended viewing distance can change our PPI recommendation.
The further a pixel is away from the viewer’s eye, the less visible that pixel becomes, and the lower resolution your graphic can be. Here are two examples. A person viewing a 100 PPI window graphic from the sidewalk two feet away will not be able to see any of the tiny pixels that make up the image. They will see a sharp, impactful retail message without the distraction of jagged, blurry images.
On the other hand, large athletic stadium banners, hanging from the rafters, are viewed from the ground and can be dozens of feet away. Consequently, they can’t be viewed closely. This type of graphic can be designed at a lower resolution — 60 PPI at final size. The lower resolution allows a printer, like us, to print a very large graphic and maintain a manageable file size in the process. The key is to know what the general viewing distance will be.
HOW TO CHECK YOUR FILE RESOLUTION
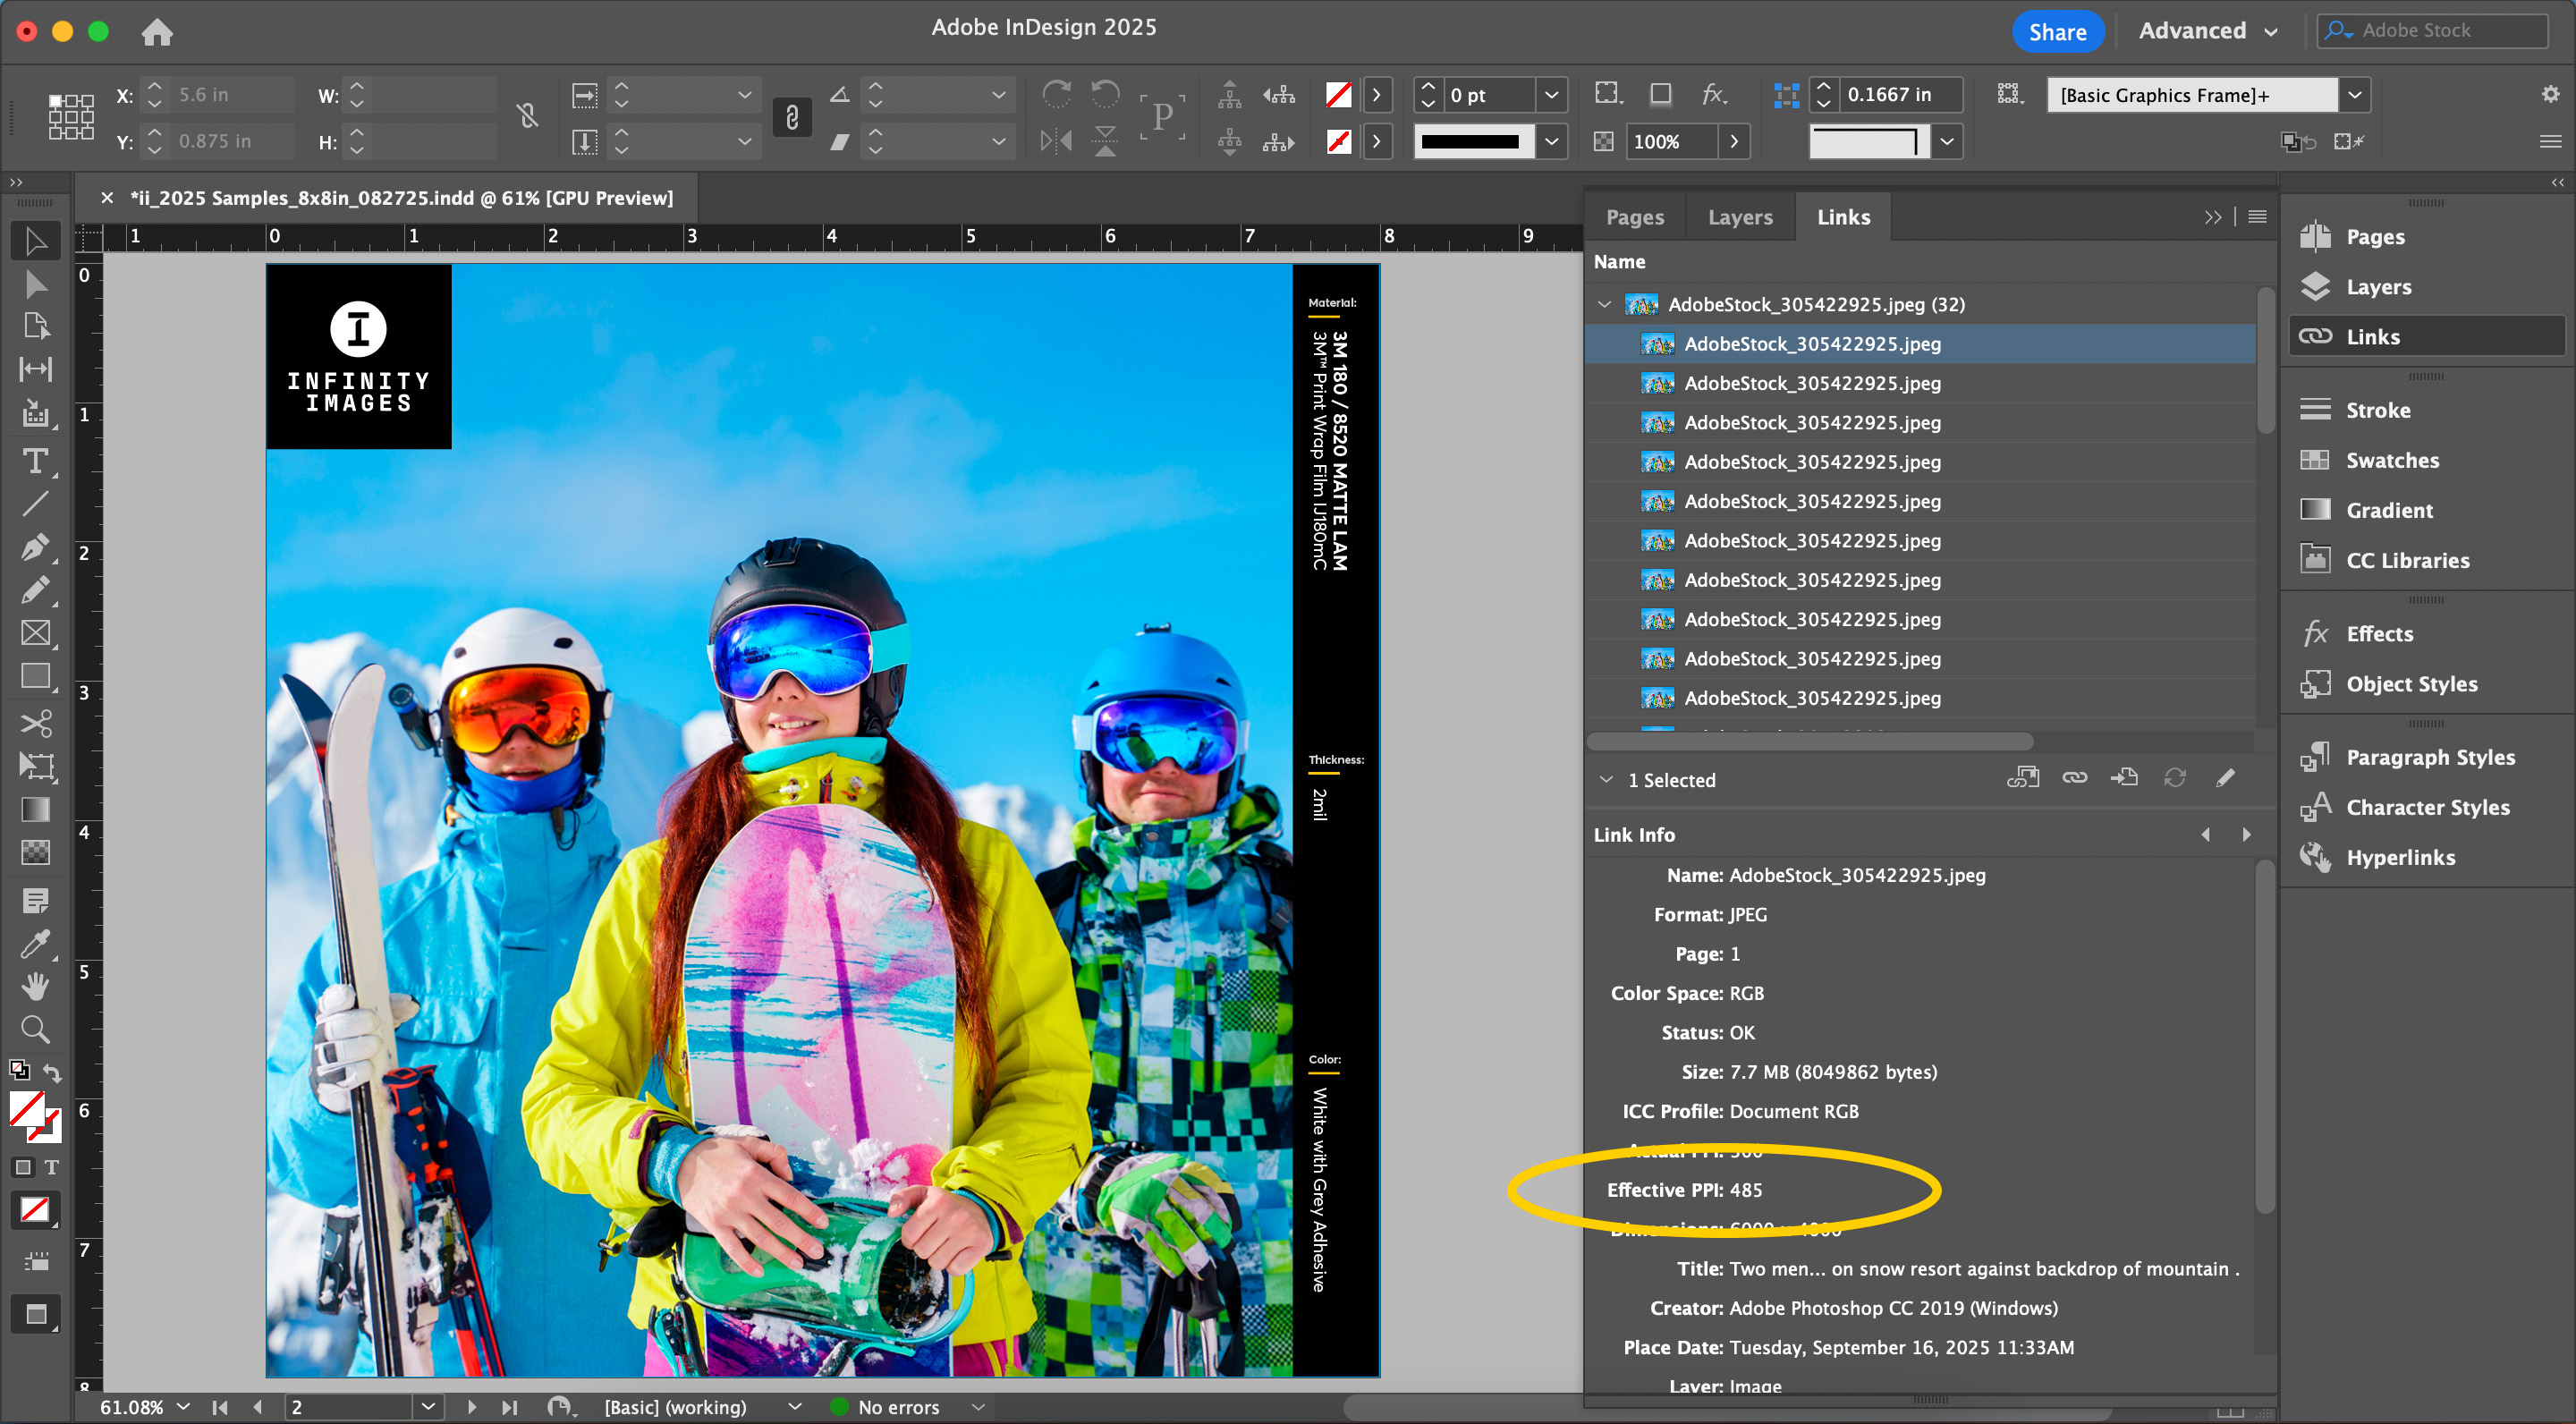
Adobe InDesign and Illustrator both allow you to look up the resolution of a photo within a design file, as well as the overall file dimensions. To determine the resolution, open the Links tab, click on the image, and then look for the Effective PPI under Link Info. The Effective PPI is the resolution at which the photo will print. In the example below, the Effective PPI is 485. This image could be enlarged almost five times and still be within our minimum resolution of 100 PPI.
If you would like to use just a small section of an image for a large, printed graphic — for example, just one athlete in a group photo of several athletes — make sure to look up the Effective PPI after you have already adjusted the image size and layout in the design file. Zooming into a photo will reduce the resolution and eventually cause the image to become pixelated.
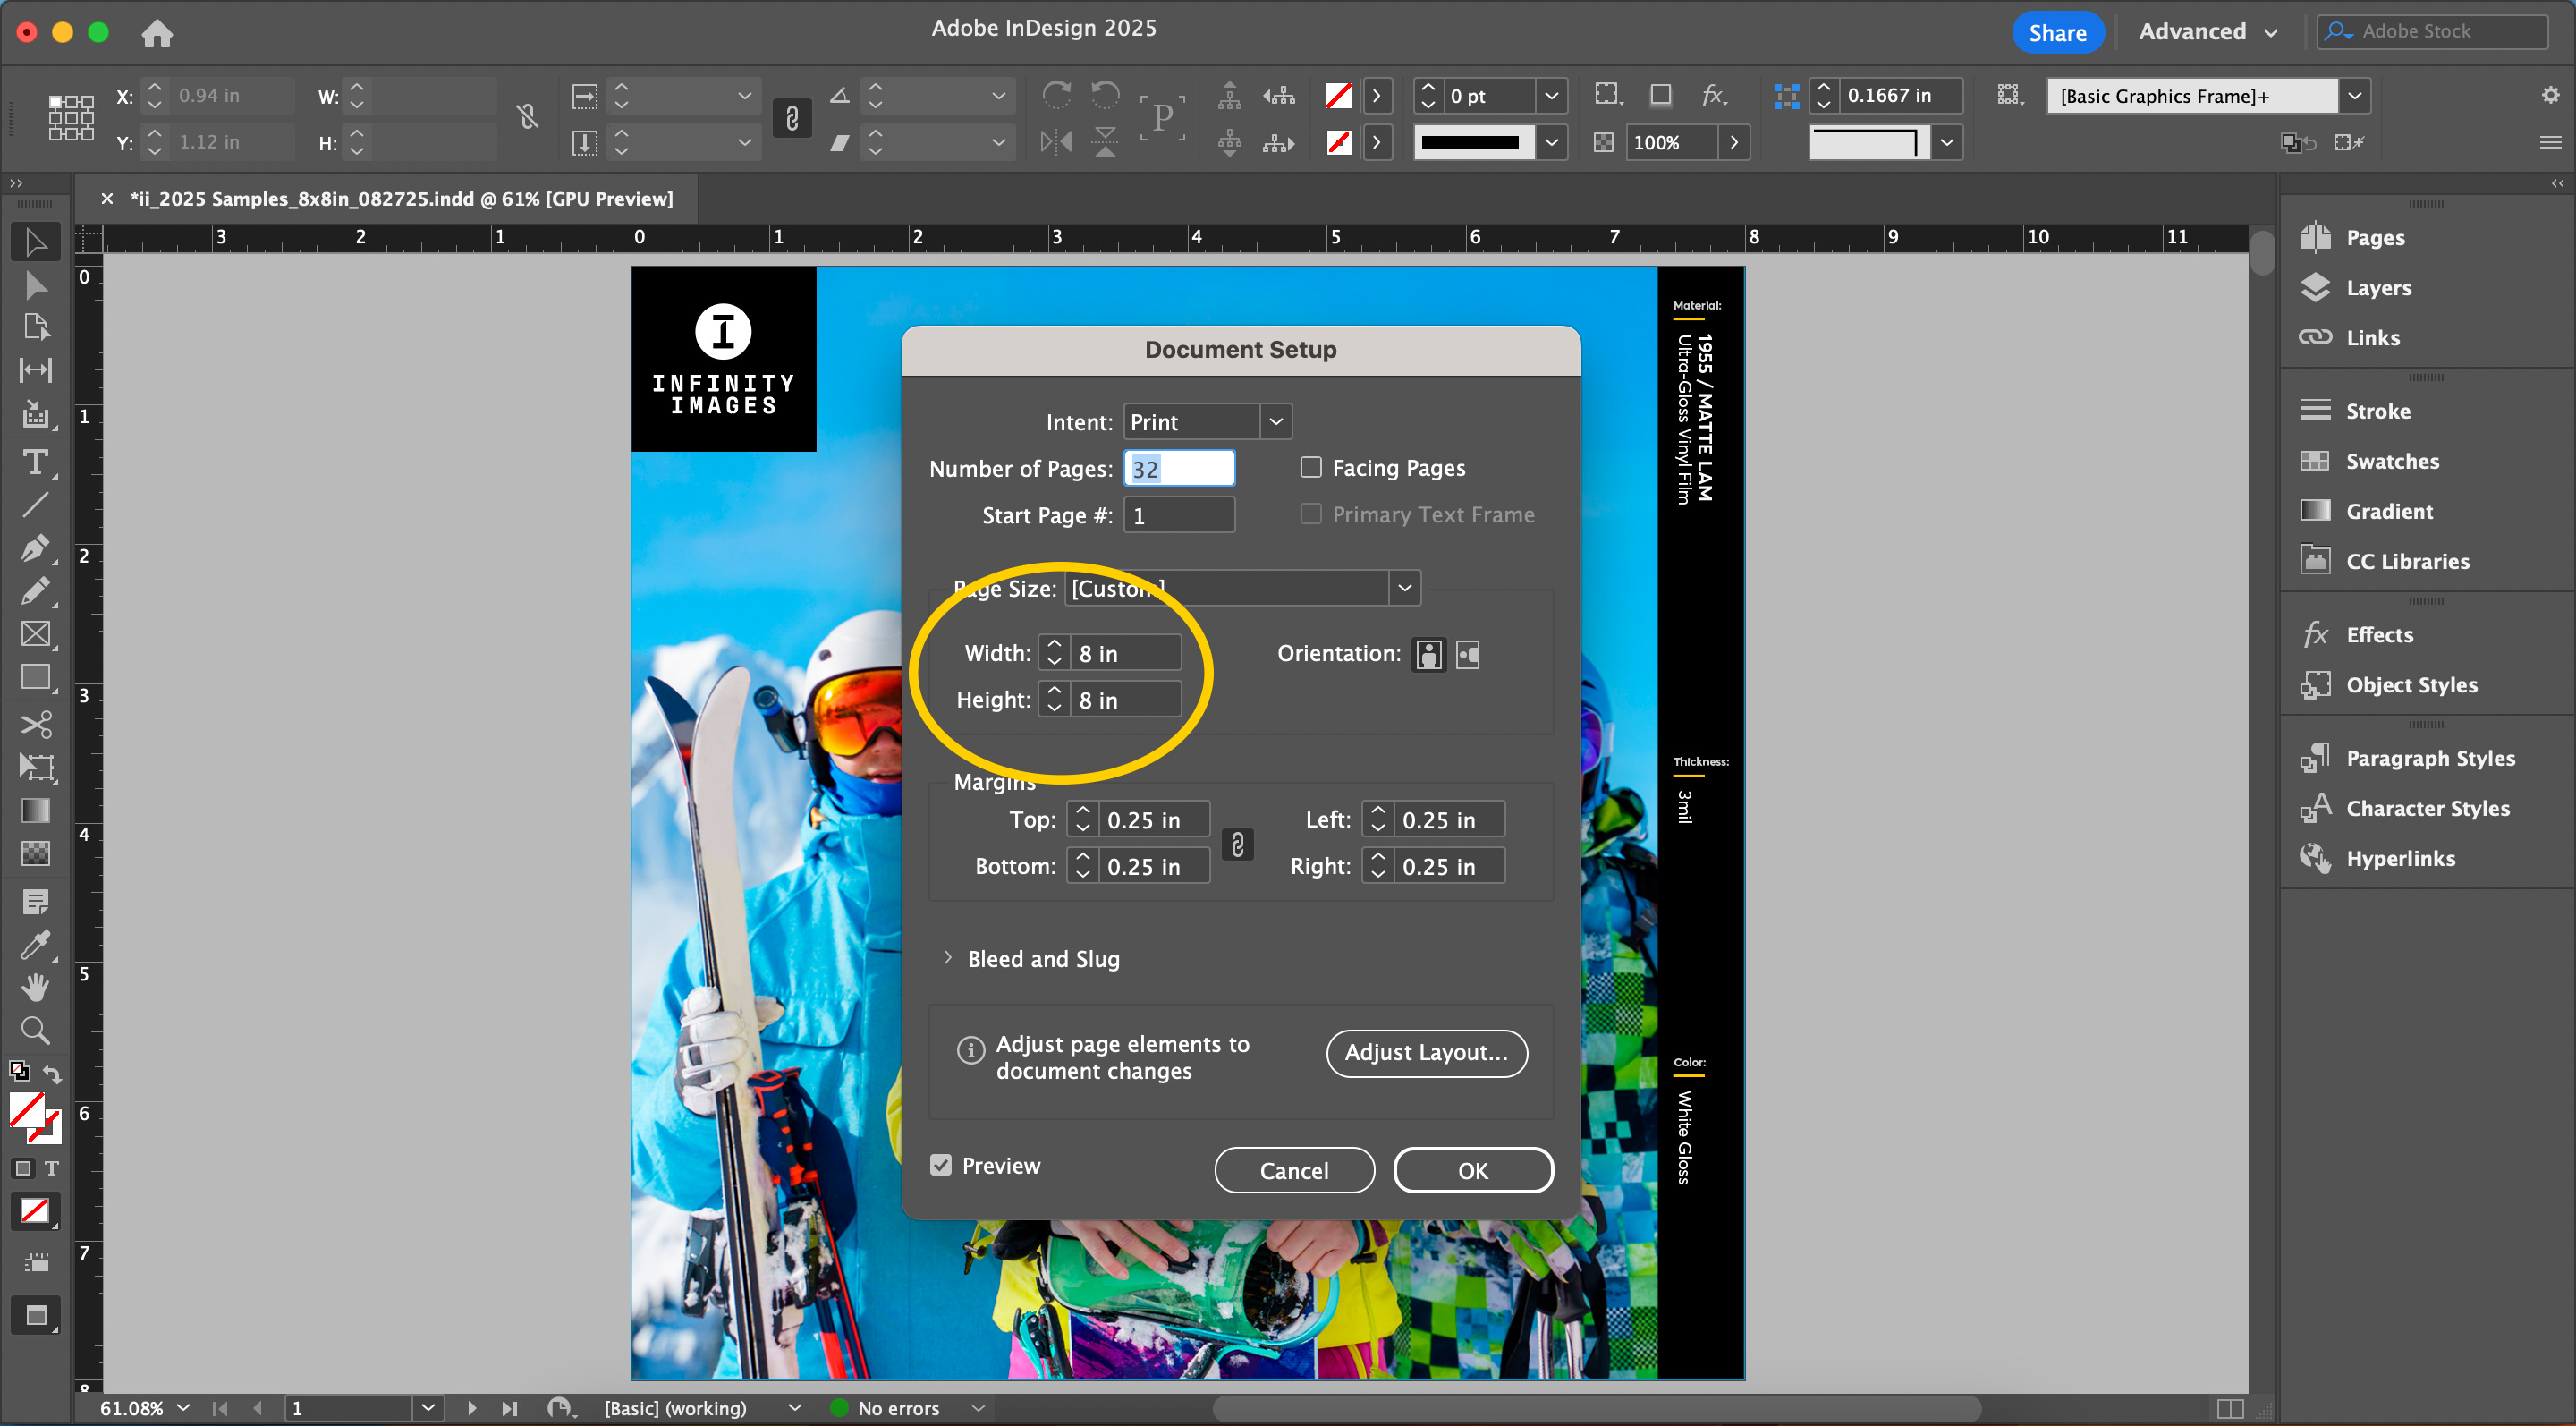
To find the overall file dimensions, click File in the top toolbar and then select Document Setup. Check the Width and Height to see if they match the final print size you want for your graphic. If the document is created at the final size, you can use the Effective PPI to verify your image meets our minimum resolution. If the art is smaller than the final size — for example, a large banner designed at ½ or ¼ scale to be enlarged for printing — and the resolution falls below our minimum requirement, you will need to adjust the image proportionally in a photo-editing program. Or, even better, select a different image that has a higher resolution.
REAL-WORLD EXAMPLES
As stated above, we generally recommend submitting print-ready art at 100 PPI at the final size, however different types of projects require different resolutions. Here are the specifics for our most popular types of large-format print projects:
- Retail Graphics: 100-150 PPI at final size
- Wall and Floor Graphics: 60 PPI at final size
- Window Graphics: 100 PPI at final size
- Banners: 60 PPI at final size
- Billboards: 30-60 PPI at final size
- Museum Graphics: 150-180 PPI at final size
- Fine Art: 180 PPI at final size
Keep in mind that we can always lower the resolution of a print-ready file, but there’s only so much we can do to increase it. Please collaborate with your Infinity Images project manager to determine any specific resolution needs for your project.
HOW WE ENSURE THE RIGHT QUALITY FOR EVERY JOB
Our team of highly experienced prepress operators ensure your photos and design files are correctly set up and ready for printing. Most client-supplied files are submitted at the correct print resolution relative to the finished size of the graphic. However, if they’re not, our prepress technicians will catch and flag the issue. Our print workflow automation system will also flag and halt the file from being sent to our printers.
If the file resolution is only a little low — for example, 80 PPI instead of 100 PPI — our prepress operators can increase the PPI without negatively affecting the final image. In these cases, we will send an updated proof back to the project manager to secure approval from the client. We may also print a press proof to show the client exactly how the image will print. However, if the resolution is much lower than recommended for that particular project’s specifications, we will most likely request a higher resolution image or suggest using a different photo altogether to fix the issue.
FINAL THOUGHTS
The main takeaway from this blog is: use the best possible image to start your project and then consider the viewing distance. Reducing image resolution makes for efficient printing, but increasing resolution is a stopgap solution to fix quality issues, and something that should be avoided if possible.
In short, the better the photo, the better the printed graphic.


